Patent DE 10 2019 117 636
Sealing arrangement for an interferometer section partially arranged in a vacuum
For precision measurements, especially for length measurements in the nanometre range, interferometers are used whose interferometer path runs partly in a vacuum. By means of a new type of sealing arrangement for the partial encapsulation of the interferometer path, a considerable reduction in environmental influences on the measurement result can be achieved compared to known bellows solutions.
While an arrangement of the interferometers is advantageous due to the dependence of the refractive index of the air on the ambient pressure in a vacuum, many measurement objects and experiments are only suitable for use in a vacuum to a limited extent due to compressibilities or heat dissipation, for example. For this reason, encapsulation of interferometer sections with varying lengths in a vacuum has long been realised using membrane bellows. The bellows can be fitted with a window at one end, the distance of which to the measuring mirror must be kept constant, leaving a small residual path of the interferometer in air. This arrangement can also be used for 2D or 3D applications. If the bellows is coupled directly to a mirror housing, a complete arrangement in a vacuum can be achieved, but only for a 1D movement. One disadvantage of using these diaphragm bellows is that the measuring circle is extended due to the space required. On the other hand, the differential pressure between the vacuum in the bellows and the atmosphere and the spring constant of the bellows create a force on the housing of the interferometer divider in the direction of measurement. Due to the hysteresis in the bellows, the control of this force is challenging.
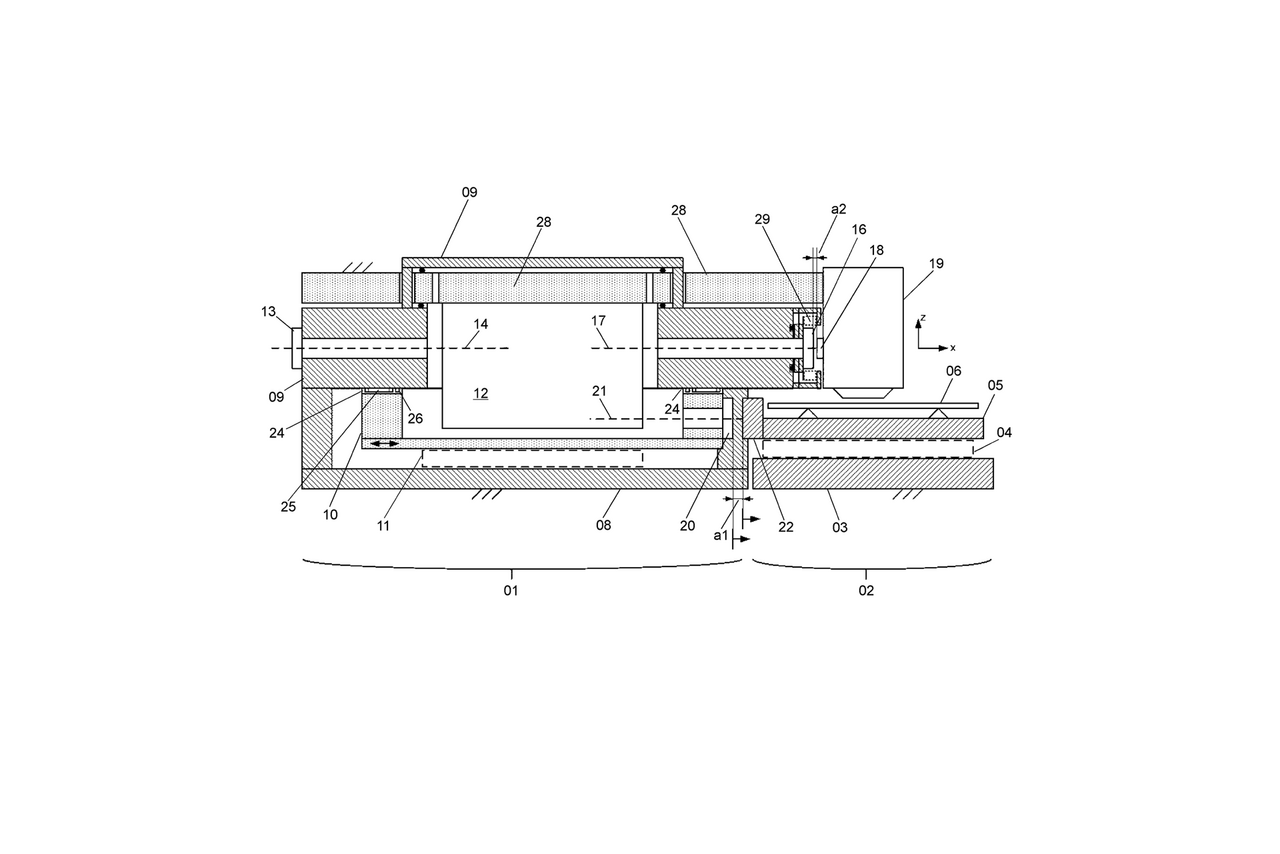
The idea of the invention consists in an alternative sealing arrangement of an interferometer housing with an air-bearing cover, in which a vacuum seal is realised in the cover by means of suction channels and a displacement of the cover and housing relative to each other is possible. The lid-air bearing is vacuum-tight, so that the vacuum in the housing is maintained even if the lid is displaced.
Advantages of the invention
- Significant reduction in the measurement uncertainty of an interferometric measuring system without having to operate the drive system with the object to be moved as a whole in a vacuum.
- The measuring circle formed for a length measurement is only extended by the housing wall and the measuring window and is therefore considerably smaller compared to using conventional bellows.
- Any forces that occur only act perpendicular to the measuring direction and can be easily absorbed by a solid housing, which prevents unwanted deformations in the direction of the measuring light beam.
- In addition to 1D applications, 2D applications are also possible.
Patent No.:DE 10 2019 117 636
Inventor:Steffen Hesse. Michael Katzschmann. Hans-Ulrich Mohr. Christoph Schäffel. Jens Flügge
Application:
Machines for measuring technical surfaces with geometric features on the micro- and nanometre scale| e.g. exposure masksResearch field:Magnetic 6D-direct drives with nanometre precision
Patent co-holder:Physikalisch - Technische Bundesanstalt, 38116 Braunschweig, DE
granted patent
Application date:01 July 2019
Date of first publication:23 July 2020
Date of publication of grant:23 July 2020
Related content
Contact
Contact
Dr.-Ing. Ludwig Herzog
Head of Mechatronics
ludwig.herzog(at)imms.de+49 (0) 3677 874 93 60
Dr. Ludwig Herzog will provide detail on our research on magnetic 6D direct drives with nm precision for the nm measurement and structuring of objects. He supports you with services for the development of mechatronic systems, for simulation, design and test of MEMS as well as for finite element modelling (FEM) and simulation.
Back


